

If your lawn looks like it’s been attacked by little underground monsters, you’re probably dealing with moles. Those sneaky diggers can turn a beautiful yard into a lumpy mess fast. I’ve been there myself, one season the lawn’s looking fresh, and the next, you’re dodging soft spots and molehills every step.
It’s frustrating, especially when you’re doing all the right things to care for your garden. But don’t worry. There are simple and effective ways to handle this, without stressing yourself out or damaging your yard more in the process.
How to Get Rid of Moles in Your Garden
The fastest way to get rid of moles is to remove their food source, apply a safe repellent like castor oil, and use traps if needed. You don’t always need poisons or heavy equipment, just a clear strategy based on what’s attracting them and how they’re moving underground.
Let’s break it down step by step so you can fix the problem and keep your garden healthy.
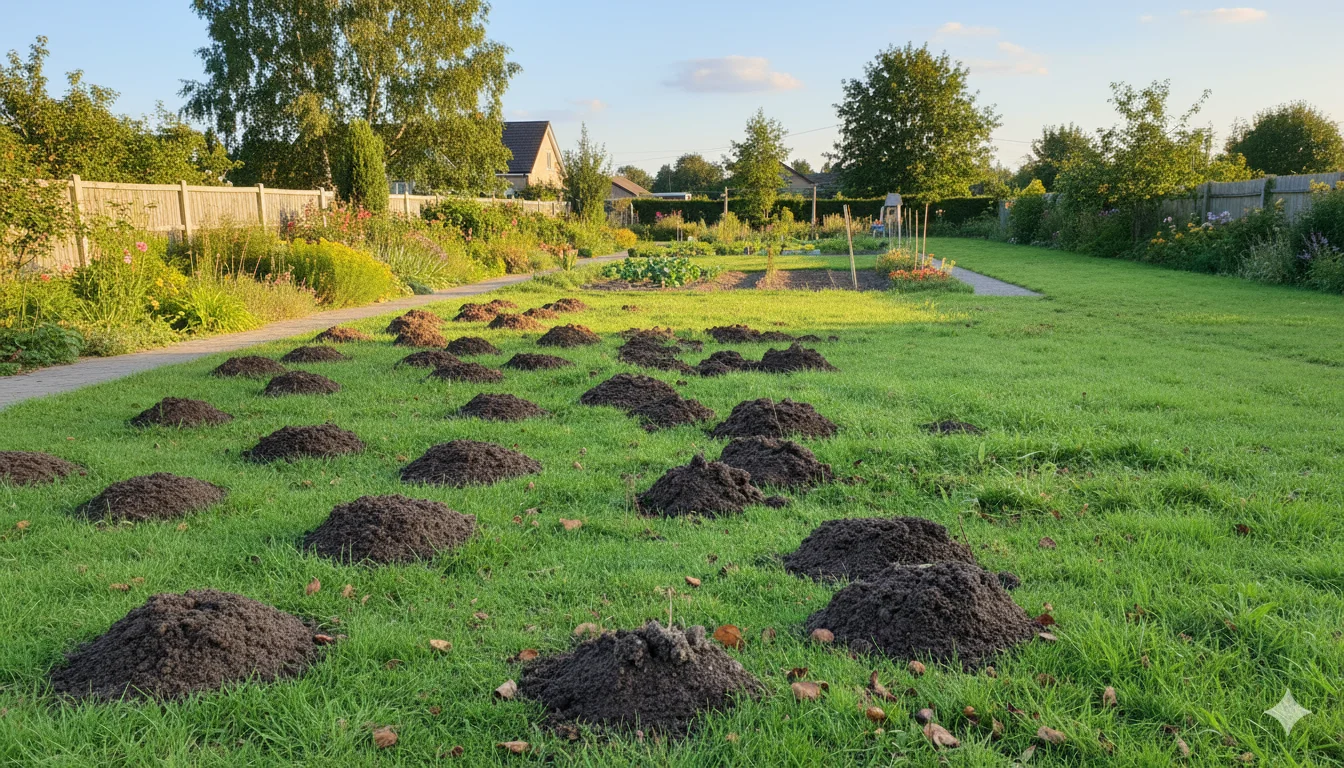
What Do Moles Look Like & Why Are They in Your Yard?
Before you can get rid of moles, it helps to understand what you’re actually dealing with. Moles are small, burrowing mammals with paddle-like front feet built for digging. They have tiny eyes and ears that are hard to spot because they spend most of their lives underground. If you’ve seen raised ridges in the soil, little volcano-shaped mounds, or patches where the ground feels soft or sunken, those are telltale signs of mole tunnels.
So why are moles targeting your garden?
The main reason is food. Moles love to feast on insects, especially earthworms and grubs. If your soil is rich and full of organic life, that’s like ringing the dinner bell for them. They’re not eating your plants, but their digging damages root systems, disturbs flower beds, and ruins the smooth look of your lawn. Moist, loose soil also makes it easier for them to tunnel, so frequent watering or recent rains can attract them even more.
I had a client once who was proud of her lush garden beds, until one day, she noticed her flowers were wilting. At first, she thought it was overwatering. But as we walked through her yard, I noticed those soft ridges and tiny mounds near the edges. Sure enough, moles were tunneling just below the surface, disturbing her roots without ever touching the plants. We worked on controlling soil pests and adding repellent plants around her flower beds. Within weeks, the moles were gone, and the garden bounced back beautifully.
That’s the thing: if you know what they want and how they move, you can push them out without destroying your yard in the process.
Are Moles Dangerous to Your Lawn or Garden?
At first glance, moles might seem like harmless little creatures just doing their thing underground. But the damage they leave behind tells a different story. While moles don’t eat plants directly, their digging causes a chain reaction that can seriously harm your lawn and garden.
When moles tunnel under your yard, they push the soil upward to create runways and mounds. This disrupts the root systems of grass, flowers, and vegetables. As roots get lifted or exposed, plants can start to wilt, dry out, or even die. What looks like a healthy lawn can quickly turn into a bumpy, uneven mess with brown spots and bare patches. It’s not just about looks either; your soil’s structure suffers, too, making it harder for water to drain properly or for new plants to take root.
Indirect Damage Adds Up
One of the biggest misconceptions I hear is that moles are harmless because they don’t chew on plants. That’s technically true; they’re after insects, not roots. But when they tunnel under garden beds or raised areas, the soil shifts and pockets form. This leaves roots hanging in air pockets instead of staying anchored in the soil. Without that tight contact, water doesn’t get absorbed properly, and the plant begins to suffer.
That’s especially frustrating when you’ve spent time and money prepping your soil and planting for a new season. A few weeks of mole activity can undo all that work before your flowers even get a chance to bloom.
The Difference Between Moles and Gophers
Another thing that often confuses homeowners is knowing whether they’re dealing with moles or gophers. Both are underground pests, but they behave differently. Moles leave behind raised, winding tunnels and small volcano-shaped mounds of loose dirt. Gophers, on the other hand, create crescent- or fan-shaped mounds with plugged holes in the center, and their feeding habits are more destructive since they actually eat roots and vegetation.
Understanding the difference matters because the way you handle each pest is different. What works for moles won’t always work for gophers, and vice versa. If you’re not sure what you’re dealing with, watching how the soil is disturbed is a good clue. A winding tunnel network just beneath the surface is a mole’s signature move.
Long-Term Effects on Your Garden
If left alone, moles can cause long-term stress to your yard’s overall health. As they dig, they bring up subsoil that may not be rich in nutrients, which gets mixed with your topsoil and weakens the growing environment. Their tunnels can also become pathways for water to rush through, leading to erosion or pooling. Over time, this can change the way your garden drains, leaving certain areas too dry and others too wet.
Some gardeners try to ignore mole damage, thinking it’s only temporary. But the truth is, one mole can tunnel up to 100 feet in a single day. Their territory can span across your entire yard in just a few weeks. By the time you realize the extent of the problem, your plants are already struggling, and your lawn is uneven.
Should You Be Concerned?
If you’re someone who takes pride in your yard, or if you’ve invested time in maintaining a vegetable garden or landscape, then yes, you should be concerned about moles. They’re not just a minor inconvenience. Their presence can undo months of work and reduce the value and usability of your outdoor space.
The good news is, with the right approach, you don’t need to panic. Moles can be managed effectively once you understand their behavior and take action early. In the next section, we’ll go over the ideal time to deal with moles so you can stop them before they take over.
The Best Time to Get Rid of Moles
Timing plays a big role in how successful you’ll be at getting rid of moles. These underground pests aren’t always active at the same level year-round. Knowing when they’re most visible and vulnerable can make your efforts more effective and less frustrating.
When Moles Are Most Active
Moles don’t hibernate, but their activity does peak during certain times of the year, mainly spring and fall. That’s when the soil is soft, moist, and easy to tunnel through. It’s also when earthworms and grubs are closer to the surface, giving moles easier access to food.
Here’s how mole activity typically changes across seasons:
| Season | Mole Activity Level | Notes |
| Spring | High | Best time to start control efforts |
| Summer | Medium to Low | Soil is harder, moles go deeper |
| Fall | High | Another great time for traps and repellents |
| Winter | Low | Moles stay deeper in the ground |
As you can see, spring and fall give you the best shot at catching moles while they’re working closer to the surface. This is when their tunnel systems are easier to detect and disrupt.
Why Early Action Matters
The Wisconsin Extension describes how controlling the mole’s food source (grubs/insects), combined with trapping, is a standard, research‑backed approach for managing mole damage. Starting early, before they expand their tunnel networks, can save you a lot of time and effort. Waiting too long gives them time to create deep runways and multiple exit points, which makes trapping and repelling more difficult.
Signs It’s Time to Act
You’ll know it’s time to start your mole removal plan if you notice:
- Fresh, loose soil mounds are popping up overnight
- New raised tunnels are appearing in different parts of the yard
- Plants are wilting despite regular watering
- Uneven or soft spots when you walk on the lawn
If you spot any of these signs in spring or fall, it’s time to act quickly. The earlier you interrupt their behavior, the easier it is to move them out and repair the damage.
Getting the timing right is half the battle. In the next step, we’ll look at how to remove what’s attracting them in the first place, their food source.
Step 1: Remove the Mole’s Food Source
Before you set traps or pour anything into the soil, the smartest first step is to take away what moles are there for, food. Moles aren’t after your plants. They’re digging through your lawn in search of juicy insects, especially earthworms and grubs. If you cut off their food supply, they’re much more likely to leave on their own.
Why Moles Love Grubs
Grubs are the soft-bodied larvae of beetles and other insects that live just below the surface of your lawn. Moles find them with ease and build tunnel networks to follow them. Earthworms are also on their menu, but most strategies aim at grub control first because it’s easier and safer to manage.
How to Control Grubs Naturally or Chemically
There are a few solid options to get rid of grubs. Some are natural and safe for pets, while others are chemical treatments used by lawn care pros. Here are your choices:
- Beneficial Nematodes: These microscopic worms feed on grubs but are harmless to humans, pets, and plants. You mix them with water and spray them over the soil.
- Milky Spore: A natural bacterium that specifically targets Japanese beetle grubs. It takes time to build up in the soil but provides long-term protection.
- Grub Killers (chemical): Fast-acting lawn treatments available at garden centers. These kill grubs quickly but should be used carefully, especially if you have pets or children.
- Drying Out the Lawn: Moles and grubs prefer moist soil. Reducing your watering schedule (just slightly) can make your yard less inviting.
When to Apply Treatments
Timing is everything. Grub treatments work best in late summer to early fall, just before the grubs mature. That’s when they’re still close to the surface and vulnerable to treatment.
Our Tip
If you’re not sure whether grubs are a problem in your yard, you can lift a small square of turf and look underneath. If you spot more than 5–10 grubs in a square foot, it’s time to act. You might also see skunks or birds pecking at your lawn, another sign that grubs are present.
Once you start reducing the food source, moles will naturally move on to find a better hunting ground. In the next section, we’ll talk about repellents you can use to push them out even faster.
Step 2: Use Safe Mole Repellents (Castor Oil & Granules)
After reducing the mole’s food supply, the next step is to make your yard less inviting. This is where repellents come in. The goal here isn’t to harm the moles, but to make the soil so uncomfortable that they choose to leave on their own. And the most trusted, effective way to do that is with castor oil-based repellents.
How Castor Oil Works Against Moles
Castor oil doesn’t kill moles, but it does irritate their senses and digestive system. When soaked into the soil, it gives off a smell and taste that moles can’t stand. The scent alone can be enough to send them searching for a new home. More importantly, castor oil coats the grubs and worms underground, making them less appealing to eat. So not only are you driving them out, you’re also making their food taste awful.
These repellents come in two forms: liquid sprays and granules. Both can be effective, but they work slightly differently. Liquid repellents are mixed with water and sprayed directly onto the soil using a hose attachment. This method is great for covering large areas quickly. Granules are sprinkled by hand or with a spreader and then watered in to activate them. Some people find granules easier to apply in small, targeted zones like garden beds or mole hotspots.
Application Tips and Frequency
For best results, it’s important to apply repellents during warm, moist weather when the soil isn’t too dry or frozen. This helps the oil penetrate down into the mole’s tunnel system. If the ground is too hard or dry, water it lightly before applying the product.
One application is usually enough to start the process, but for stubborn infestations, a follow-up treatment may be needed after 7 to 10 days. You’ll likely see new tunnel activity at the edges of your yard as the moles begin to leave. That’s a good sign; they’re on their way out.
If you’re worried about kids or pets playing in the treated area, castor oil products are generally safe as long as you follow label instructions. There’s no harmful residue, and it won’t damage plants or grass.
Repellents won’t solve everything on their own, but paired with food source control, they’re one of the most powerful tools you can use. In the next step, we’ll look at more humane ways to keep moles from coming back.
Step 3: Try Humane Ways to Keep Moles Away
Sometimes, a gentle push is all it takes to send moles packing. Humane methods are great for people who want to avoid traps or chemicals but still need results. One of the oldest tricks in the book is planting natural mole deterrents. Plants like daffodils, marigolds, castor bean, and alliums give off scents or compounds that moles dislike. These can be placed around garden beds or along property lines as a soft, living barrier.
Another method some gardeners swear by is flooding active tunnels. By pushing water into the main runway using a garden hose for several minutes, you can make the space less livable. Just be cautious not to overdo it, you don’t want to drown your garden in the process.
Ultrasonic devices are also widely available. These are small spikes you place into the soil that emit high-frequency sounds or vibrations. While results vary, some homeowners find them helpful for ongoing prevention. The key is placing them in active mole zones and moving them around periodically.
Step 4: When to Use Traps (and When to Call a Pro)
If gentle methods haven’t worked and mole activity keeps getting worse, it might be time to consider traps. These come in two types: live traps, which allow you to catch and relocate the mole, and lethal traps, which kill the mole quickly underground. Live traps are ideal for those who want a humane option, but they require you to check them frequently and relocate the animal far from your property.
Setting traps properly takes a bit of skill. You need to find the main active tunnels (usually straight, well-worn lines) and place the trap correctly. If it’s too shallow or off-center, the mole will just go around it. That’s why some people call in professionals; they can assess the mole’s movement and pick the right trap and location.
Traps should always be used with care, especially if you have children or pets nearby. Some traps are sharp and can be dangerous if not handled correctly.
Step 5: Install Underground Barriers if Moles Keep Coming Back
If moles are a recurring issue in your garden, an underground barrier might be the long-term solution you need. These are typically made of hardware cloth or metal mesh and are buried around garden beds or property edges. For effectiveness, the barrier should extend at least 12 inches deep and a few inches above the soil to block tunneling and entry from below.
Barriers work best for protecting specific zones like vegetable patches or flower beds rather than the entire lawn. They’re a great add-on to other control methods, offering physical protection that moles can’t bypass easily.
Are Mole Poisons Safe? (What to Know Before Using)
Mole poisons and baits are available in stores, but they should be treated as a last resort. Many of them mimic the mole’s natural food (like worm-shaped poison baits), and while they can be effective, they carry serious risks. Pets, wildlife, and even children could come into contact with these products if they’re not applied carefully.
There’s also the issue of control. Once a poison is placed in a tunnel, you can’t always be sure where it ends up or how long it remains active. That uncertainty is why many homeowners and professionals avoid poisons unless there’s no other option.
If you do choose to use them, follow the label exactly, use gloves, and keep everyone off the treated area. In many cases, though, safer methods like repellents, traps, and barriers are more than enough to solve the problem without the risks.
Final Thoughts: Take Back Control of Your Garden
Moles can be frustrating, but they’re not unbeatable. By understanding what attracts them, removing their food, using safe repellents, and reinforcing your yard with smart prevention, you can reclaim your lawn without stress.
You don’t have to try everything at once. Start with one or two proven methods, stay consistent, and you’ll see progress. Whether you handle it yourself or call in a pro, the key is acting early before the damage gets worse.
Need Help with Mole Problems? Let D&G Amigo’s Handle It for You
If moles are tearing up your lawn or garden and you want it fixed the right way, we’re here to help. At D&G Amigo’s Home Care, we know how to deal with stubborn yard pests safely and effectively, using methods that protect your plants, your pets, and your peace of mind.
We proudly serve homeowners in Cleveland, TX, and surrounding areas, offering professional mole control, lawn care, and garden maintenance all in one trusted service.
Visit us to schedule a visit or get a free quote today. Let’s get your yard back in shape, mole-free and looking great.
