
How to Move a Garden Shed
If you’re wondering how to move a garden shed, the short answer is this: empty it, lift it carefully using proper tools or professional help, transport it to the new location, and make sure it’s level and stable once placed. Whether DIY or hiring help, safety and prep matter more than anything else.
Should You Move It Yourself or Hire a Local Pro?
When DIY Makes Sense
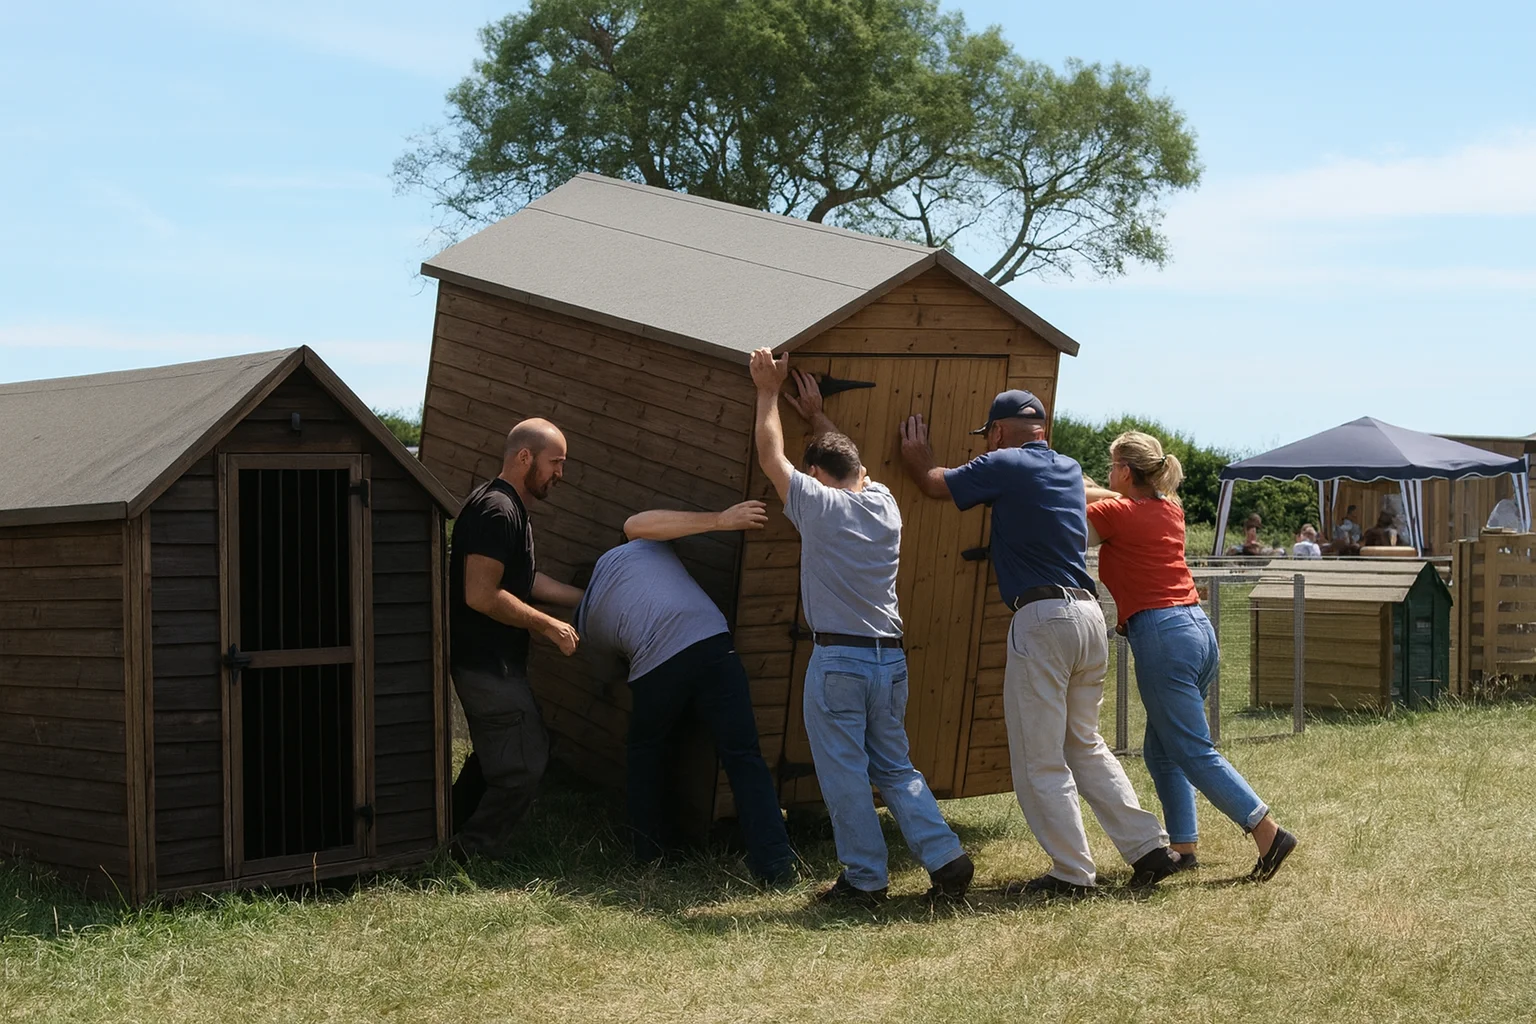
Moving a shed yourself is totally possible if the shed is small, the ground is dry, and you’ve got the right tools (and a couple of strong friends). You’ll save some money, and there’s a certain satisfaction in doing it with your own hands. Just make sure the shed is structurally sound and not falling apart at the corners.
One time, I helped a buddy move his 8×10 wooden shed across a sloped backyard. We used steel pipes and an old car jack. It took us the whole afternoon, but we got it done. Looking back, we should’ve prepped the new site better, but we learned a lot.
When It’s Safer to Call a Pro
Professional shed movers are best if your shed is:
- Large, heavy, or anchored to a foundation
- In a tight spot or hard-to-reach area
- At risk of tipping due to rot or damage
Pros also come with specialized equipment like hydraulic lifts or the Mule delivery system. They can lift, transport, and reset your shed without you lifting a finger.
Cost Comparison (DIY vs. Hiring)
Here’s a quick breakdown to help you decide what works best for your situation:
| Option | Estimated Cost | Pros | Cons |
| DIY Move | $50–$200 (tools/trailer rental) | Low cost, hands-on, flexible | Labor-intensive, risk of damage |
| Hire a Pro | $300–$900+ | Fast, safe, includes leveling/setup | More expensive, needs scheduling |
What’s the Bottom Line?
If you’ve got a smaller shed, decent tools, and helping hands, you can pull it off. But for bigger or anchored sheds, professional movers reduce the risk of damage and injury. Either way, plan every step and make sure the shed arrives safely at its new home.
Tools & Equipment You’ll Need for a DIY Shed Move
Basic Gear You Can’t Skip
If you’re planning to move a shed yourself, the right equipment is everything. Don’t even think about lifting it without proper support tools. Here’s a list of what you’ll likely need:
- Hydraulic jack – To lift each side of the shed gently without causing strain or cracks.
- Sturdy pipes or scaffolding poles – These help roll the shed if you’re going across flat ground.
- Plywood sheets – To create a smooth path, especially on uneven or muddy surfaces.
- Heavy-duty dolly or furniture skates – For short-distance moves on firm ground.
- Utility trailer or flatbed truck – For transporting the shed if you’re going farther than across the yard.
- Tie-down straps and ratchets – To secure the shed while transporting.
- Basic toolkit – Crowbar, screwdrivers, hammer, and drill in case you need to remove windows or doors.
- Work gloves and steel-toe boots – Always prioritize safety.
Optional But Helpful Equipment
- Mule delivery system – Professional-grade tool used to lift and maneuver sheds with precision. It’s often rented out or used by shed-moving services.
- Laser level or builder’s level – To ensure your new shed site is even before setting the shed down.
Keep in mind that renting or borrowing some of these tools can save you a lot, especially if you’re only doing this once. Use solid boards and a level base to avoid slipping or tipping while moving.
Step-by-Step: How to Move a Shed
Step 1: Empty Everything Out
Start by clearing out the entire shed. Take out all your tools, storage boxes, garden supplies, and anything else that’s been tucked away. Don’t forget to remove hooks, shelves, or any loose boards on the walls. This step matters because a loaded shed is much heavier and riskier to move. Things can shift around and damage the inside walls or even break. I remember helping my friend move his shed, and he forgot to take down a shelf, it ended up ripping off and breaking a window.
Step 2: Inspect the Shed Structure
Now take a walk around the shed and check how strong it still is. Look closely for soft spots in the wood, rotting edges, cracks in the walls or joints, or panels that seem loose. If you find anything weak, you’ll need to fix or reinforce it from the inside. A sheet of plywood or a couple of braces can help keep it stable. You don’t want something falling apart while it’s midair; that’s a headache no one wants.
Step 3: Detach From the Foundation
Next, figure out how the shed is sitting on the ground. If it’s on a simple gravel base or wooden skids, you’re lucky; it should lift up fairly easily. But if it’s bolted down to a concrete base or anchored with metal brackets, you’ll need to get under there with a crowbar or drill to loosen everything. Take your time and make sure it’s fully free. My neighbor once forgot to unbolt one corner, and it nearly split the frame when we started lifting.
Step 4: Lift With Care
This is the part where you’ll want help. Use a hydraulic or car jack to lift one corner of the shed at a time. Once it’s up high enough, slide something sturdy like rollers, metal pipes, or a dolly underneath. Do the same for each side until the whole shed is sitting evenly and securely. Don’t rush this part. When I helped a friend with this, we had one side higher than the other, and it almost tipped. Having someone to guide and double-check makes a huge difference.
Step 5: Roll or Load It for Transport
If you’re just moving the shed across your yard, you can gently push it along using the rollers. To make it smoother, lay down some plywood as a path so the rollers don’t sink into the ground. Go slowly and make small adjustments as you go.
If you’re taking it to a different location, you’ll need a trailer. Back the trailer under the shed as much as possible, then lower it onto the bed. Secure everything tightly using strong ratchet straps. Drive slowly and avoid making any sharp turns or sudden stops. It helps to mark which end of the shed is the front so you can position it right when you unload it.
Step 6: Prep and Place at New Location
Before you even bring the shed over, make sure the new spot is ready. The ground should be flat and firm. Use a level to check that everything is even. Set down some concrete blocks or pressure-treated skids to give the shed a solid base. Once everything looks good, gently lower the shed into place. Then double-check with your level again to make sure it’s sitting right. A friend of mine didn’t level things properly once, and his doors wouldn’t close right afterward, definitely something to avoid.
A 2018 case study published in Acta Technica Napocensis showed that reinforcing structures before lifting or relocating them significantly reduces the risk of collapse or damage. Engineers in Paris successfully used underpinning techniques to stabilize aging buildings during excavation, proving that proper structural support makes heavy moves much safer.
My Own Experience Moving a Shed
A couple of years ago, I helped my uncle move his old garden shed across a grassy lot after a heavy rain. We thought we were ready: hydraulic jack, steel pipes, straps. But the ground was so soft, the pipes kept sinking. We had to pause and lay down wide plywood sheets just to roll the shed across without it tipping. It took us the whole day and a lot of effort, but we learned how much ground prep matters. If we’d skipped that step, the shed would’ve collapsed halfway through.
That moment taught me that moving a shed isn’t just about strength, it’s about thinking ahead.
What to Check Before You Move a Shed
1. Foundation Type
The type of foundation your shed sits on changes everything. If it’s on wooden skids or concrete blocks, you’re in luck; those are much easier to move. But if it’s bolted to a slab or anchored into the ground, you’ll need extra time and tools to disconnect it safely. Always look underneath before assuming it’s move-ready.
2. Ground & Weather Conditions
Soft or wet soil can be a real problem. If the ground is muddy or uneven, your rollers or skids might sink or slide. Make sure the path is dry, level, and free of obstacles. Check the forecast too. Moving a shed in the rain or right after a storm can lead to a dangerous mess.
3. Physical Access to the Path
Look at the route you plan to take from the current shed location to its new spot. Are there:
- Trees or thick branches in the way?
- Fences, decks, or narrow gates that block access?
- Low-hanging power lines or cables?
If so, you’ll need to either adjust the route or temporarily remove those barriers.
4. Shed’s Structural Health
Before any move, check if the shed can even handle it. Look for:
- Soft or rotting floorboards
- Loose walls or sagging roof
- Nails sticking out or rusted hardware
If the structure isn’t solid, moving it could cause collapse. Reinforce weak areas or consider partial dismantling if necessary.
5. Local Permit Requirements
Some cities or counties require a permit to move or place a shed. If you’re crossing property lines or relocating the shed within a regulated area, check with your local building department. Even if permits aren’t required, it’s good to confirm you’re not violating any spacing or boundary rules.
Common Mistakes That Can Ruin a Shed Move
Ignoring Structural Damage Before Lifting
One of the biggest mistakes is assuming the shed is strong enough to handle being lifted. If the floor is weak or the walls are loose, lifting can cause cracking or even full collapse. Always check and reinforce weak points first.
Forgetting to Prepare the New Site
People often focus so much on the move that they forget to prep the new location. If the ground isn’t level, compact, and ready with blocks or skids, you’ll end up placing the shed on uneven footing, which can lead to long-term warping or water damage.
Moving Over Muddy or Soft Ground
Rolling a shed over soft ground without support is asking for trouble. Pipes or wheels can sink, tip, or twist the structure. Lay down plywood or solid boards to create a temporary track if the soil is damp or unstable.
Not Removing Windows, Doors, or Loose Parts
Loose doors, glass windows, and other detachable features should always be removed or secured. If left unattended, they can break or cause injuries during the move. A quick check can prevent hours of repair later.
Rushing the Job Without Help
Trying to move a shed too quickly or with too few people is both unsafe and inefficient. You need at least two people for even a small shed, and more if it’s big or bulky. Rushing often leads to damage, injury, or getting stuck halfway through.
Final Thoughts
Moving a shed might seem like a tough project, but with the right tools, planning, and care, it’s totally manageable. Whether you go the DIY route or hire a professional, the key is to prepare properly, check the shed’s condition, clear the path, and secure everything during transport. Skipping these steps often leads to damage or frustration. Take your time, stay safe, and don’t be afraid to ask for help when needed. A well-moved shed can serve you just as well in its new spot as it did in the old. Plan smart, and the job gets much easier.
Need Help with Lawn Services in Cleveland, TX?
If you’re looking for reliable and professional lawn care, check out DNG Amigos. They offer quality lawn services in Cleveland, TX, and surrounding areas to keep your outdoor space looking its best all year round.
FAQ – Moving a Shed (What People Ask)
Can you move a shed without dismantling it?
Yes, you can move a shed in one piece if it’s structurally sound and not too large. Sheds on skids or blocks are easiest to move without taking them apart. Just make sure the route is clear and the shed is secure during the move.
Do I need a permit to move a shed?
In many areas, a permit isn’t required for moving a shed within your own property. But if you’re relocating it across properties or changing its position in a way that affects boundaries, check with your local building department to stay compliant.
How much does it cost to move a 10×12 shed?
For a DIY move, you might spend $50–$200 on equipment rentals. Hiring a professional mover for a shed this size usually ranges from $300 to $700, depending on distance and access conditions.
Will moving damage the shed structure?
It can, especially if the shed has rot, is poorly constructed, or is not lifted evenly. That’s why inspecting and reinforcing it beforehand is so important. Professional movers use specialized gear to reduce the risk of cracking, tipping, or warping.
What’s the best way to move a shed across a backyard?
The easiest method is to use PVC pipes or metal rollers underneath the shed to roll it slowly across flat ground. You’ll need to jack it up slightly to slide the rollers underneath. For uneven yards or soft ground, using a trailer or hiring a mover with a skid steer may be safer and faster. Always go slow and have someone guide the move.
